# Introduction
This is a workshop that will let you know how you can add validation to a vue.js application with vuelidate library and then just deploy it live.
# Meet Vuelidate (opens new window)
# What you'll need
- Chrome Browser
- github.com (opens new window) account
- codesandbox.io (opens new window)
- netlify.com (opens new window)
- Basic knowledge of JavaScript (ES6/2015)
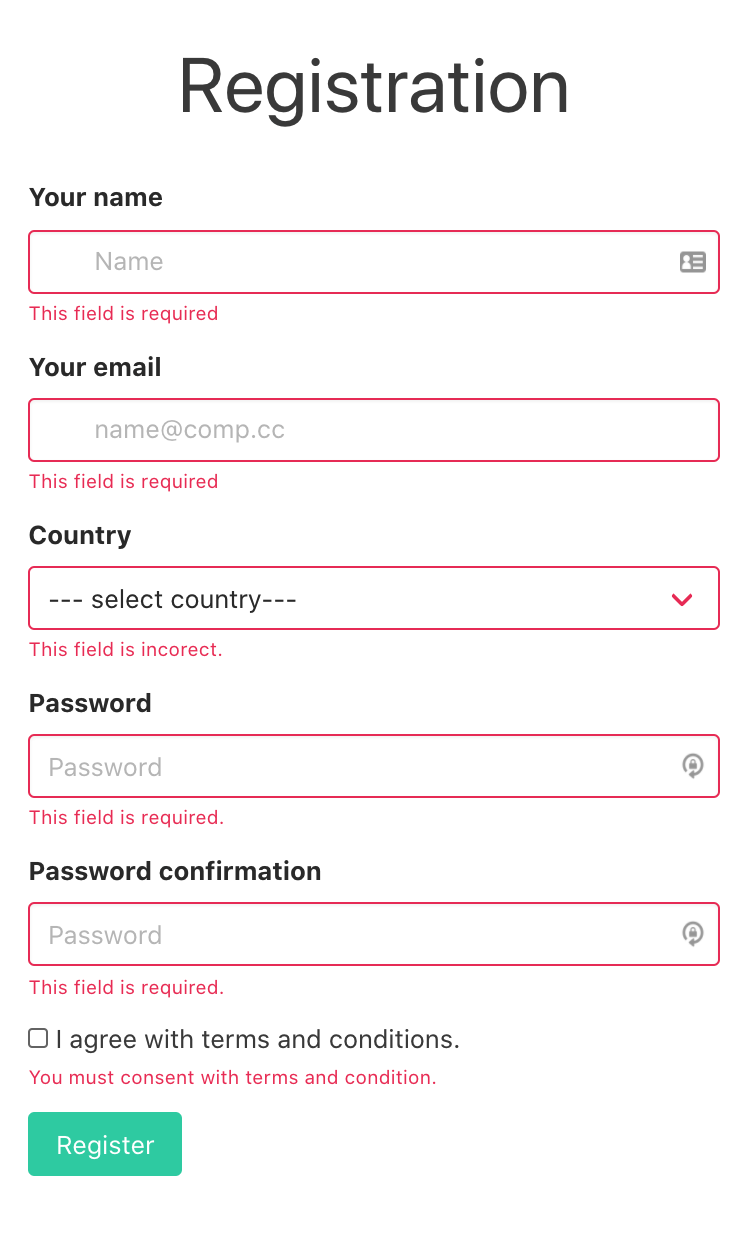
# What you'll build

# What are we going to do:
- Include vuelidate via dependencies
- Add validation for name
- Add validation for email
- Add validation for country
- Add validation for password
- Add validation for password confirmation
- Add logic for
submitMemethod
# Start from here
Open this codesandbox once you are logged in: Codesandbox template (opens new window)
Don't forget to select Auto Save from File menu on the codesandbox editor.
# Include vuelidate dependency
We do this by simply pressing "Add Dependency". In the search box look for vuelidate and add it.
Open main.js and add the following import and use:
//main.js
import Vuelidate from "vuelidate";

Vue.use(Vuelidate);
# Import validations
Open components\TheForm.vue and right after the opening <script> add the import for the vuetify validations that we'll use:
//components\TheForm.vue
import { required, email, sameAs } from "vuelidate/lib/validators";
Then after the data(){} block add an empty one like this:
//components\TheForm.vue
validations: {

},
# Add name validation
In the components\TheForm.vue add the validation for name form filed inside validations block.
//components\TheForm.vue
name:{required}
Find in the template of the component the html element
<input v-model.trim="name" class="input" type="text" placeholder="Name">
tip: search for v-model.trim="name"
and replace it with :
<input v-model.trim="name" :class="{'is-danger': $v.name.$error}" class="input" type="text" placeholder="Name">
and then, after the closing </p> that contain the input add:
<!-- error paragraph after this -->
<p  v-if="$v.name.$dirty && !$v.name.required" class="help is-danger"> This field is required.</p>
# Add email validation
In the components\TheForm.vue add the validation for email form filed inside validations block.
,email: { required, email }
Find in the template of the component the html element
<input class="input" v-model="email" type="email" placeholder="name@comp.cc" >
tip: search for v-model="email"
and replace it with :
<input class="input" v-model="email" :class="{'is-danger': $v.email.$error}" type="email" placeholder="name@comp.cc">
and then, after the closing </p> that contain the input add:
<!-- error paragraph after this -->
<p  v-if="$v.email.$dirty && !$v.email.required" class="help is-danger">This field is required</p>
<p  v-if="$v.email.$dirty && !$v.email.email" class="help is-danger">This field is incorect</p>
# Add country validation
In the components\TheForm.vue add the validation for name form filed in the validations block.
,country:{required}
Find in the template of the component the html element
<select v-model="country">
tip: search for v-model="country"
and replace only the opening tag <div> right above it with :
<div class="select is-fullwidth" :class="{ 'is-danger': $v.country.$error }" >
and then, after the closing </div> that contain the select add:
<!-- error paragraph after this -->
<p v-if="$v.country.$dirty && !$v.country.required" class="help is-danger">This field is incorect.</p>
# Add password validation
In the components\TheForm.vue add the validation for pass form filed in the validations block.
pass: { required },
Find in the template of the component the html element
<input v-model="pass" class="input" type="password" placeholder="Password" />
tip: search for v-model="pass"
and replace it with :
<input v-model="pass" :class="{ 'is-danger': $v.pass.$error }" class="input" type="password" placeholder="Password"/>
and then, after the closing </div> that contain the input add:
<!-- error paragraph after this -->
<p v-if="$v.pass.$dirty && !$v.pass.required" class="help is-danger" >
This field is required.
</p>
# Add password confirmation validation
In the components\TheForm.vue add the validation for passConfirm form filed in the validations block.
passConfirm: { required, sameAsPass: sameAs("pass") },
Find in the template of the component the html element
<input v-model="passConfirm" class="input" type="password" placeholder="Password" />
tip: search for v-model="passConfirm"
and replace it with :
<input v-model="passConfirm" :class="{ 'is-danger': $v.passConfirm.$error }" class="input" type="password" placeholder="Password" />
and then, after the closing </div> that contain the input add:
<!-- error paragraph after this -->
 <p v-if="$v.passConfirm.$dirty && !$v.passConfirm.required" class="help is-danger" >
    This field is required.
</p>
<p v-if="$v.passConfirm.$dirty && !$v.passConfirm.sameAsPass" class="help is-danger" >
    This field is not the same as password.
</p>
# Add consent validation
Let's create a custom validation for consent. We add the following method after the import statement.
//agree with terms and conditions
const mustBeTrue = (value) => {
  return value === true;
};
This simple validation will just check the received value is true.
In the components\TheForm.vue add the validation for consent form filed in the validation block.
//add me inside validation block
consent: { mustBeTrue },
Find in the template of the component the html element
<input type="checkbox" v-model="consent" />
tip: search for v-model="consent"
and replace it with :
<input type="checkbox" v-model="consent" :class="{ 'is-danger': $v.consent.$error }" />
and then, after the closing </label> that contain the input add:
<!-- error paragraph after this -->
 <p v-if="$v.consent.$dirty && !$v.consent.mustBeTrue" class="help is-danger" >
    You must agree with terms and condition.
</p>
# Add logic for submitMe method
In the components\TheForm.vue replace the submitMe function from the methods block with the new one:
 submitMe() {
    // force touch to verify all fields
    this.$v.$touch();
    window.scrollTo({top:0, behavior:"smooth"});

    if (!this.$v.$invalid) console.log("submiting ...." + this.name);
    },
Now we are using vuelidate to force the form to validate all the fields updated or not in the component using this.$v.$touch() and then we permit the submitting of the form only if all validation rules are valid using $v.$invalid.
In case you want to directly see the final version go to this url: Workshop completed (opens new window)
# Congratulations
You have learned validation with Vuelidate (opens new window). Following this workshop gave you knowledge of adding and using a validation framework inside a Vue.js application.